Art Lesson Examples
Great Painters of the World Unit/Lesson #1 Henri Matisse
Date: 10-10-08 Subject Area: Art /Design
Name: Jeremy Dumkrieger Grade: 2
Standard/Benchmark being addressed: Level 1. Grades K-2
S1.0 The student understands the visual arts in relation to history and culture.
B1.1 The student knows that specific works of art belong to particular cultures, times,
and places.
CI-2 begins to recognize that art can represent specific cultures, times, and
places by grouping similar works of art together.
S1.0 The student understands and applies media, techniques, and processes.
CI.2 applies the elements and principles of design by incorporating them into
works of art.
Gr. 2 – C.I.1. distinguishes between basic shapes and lines.
1. Housekeeping Details:
Print of Goldfish
PowerPoint: A Brief History of Henry Matisse and his art movement called “fauvism.”
12” x 18” ” white paper and 12” x 9” white paper
Scissors, Glue
Blue watercolor, brushes, water, salt
Textures (texture panels or other found items.
Old crayons without wrappers
Orange tissue paper
Variety of scrap paper
Art Journal
2.) Concept, Generalization, or Skill: Students will learn to use shapes and observation to re-create their own version of Henri Matisse’s Goldfish. Students must make a painting and collage based on the famous painting using harmony created by using line, shape, and color.
3.) Objectives(s):
Student will:
• Actively explore masterworks by Henri Matisse
• Understand what it means to paint like a “Wild Beast.”
• Accurately interpret Goldfish
• Effectively demonstrate orally, visually, and/or in writing a deep understanding of Matisse’s masterwork
• Reflect upon learning
4) Procedures:
Open (How will you focus their attention?):
Bell-ringer:
Written on the board: In your Art Journals write down the age of the oldest living goldfish. You may quietly discuss this with your neighbors.
The teacher will direct the students write their answer in their art journals. The art journals are kept in a box labeled period 4. After one minute, the teacher will focus the students to the front of the room for the answer and lesson. The teacher will tell the students the record for the longest living goldfish is 43 years of age. This is, however, very rare – a gold fish living 10 years of age is not unheard of. How many students have had a gold fish in their house? Wait for response. How many have eaten one? Wait for response.
1. The teacher will show students a picture of Henri Matisse’s Goldfish and ask if they know who painted it.
2. The teacher will show the students a PowerPoint presentation of the work of Henri Matisse. Teacher will explain fauvism or “Wild beasts” (Fauvism is a short-lived art movement headed by Matisse indicative of simplified color and representation. Bright colors and brush strokes were also staples of the movement. For further information, please see the book of Art Masters near the shelf on the desk.)
3. The teacher will talk about the ways of creating art like Matisse, i.e. collage, painting, fauvism, etc.
4. The teacher will display and discuss how harmony is created with line, shape, and color in Goldfish and how every part of the painting leads the eye to the goldfish.
5. The teacher will contrast and compare collage to paper cutouts and define and discuss multi-media designs
(Optional – Students may want to work on project by looking at real bowl of goldfish.
Body
The student will be asked to make their own rendition of Matisse’s Goldfish
Day One:
1.Using textures such as texture panels, sand paper, plastic grates or other items from the cardboard box marked textures; students will make a rubbing on the larger paper. Students will use the crayons in the box marked “rubbing crayons” sitting on the third shelf of the blue storage cabinet. Both sizes of paper are also found on this shelf.
2.Put this paper aside. 10 min
3.Using plenty of water, paint the 12” x 9” white paper with blue watercolor paint. 10 min
4.Sprinkle salt across the surface of the wet paint. 10 min
5.Allow to dry overnight. Instruct students to put these one the drying rack.
Day Two:
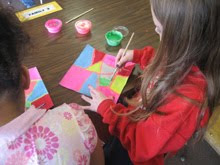
6.Cut a fishbowl shape from the blue paper and glue to the collage area. 7 min
7.Cut goldfish from orange tissue paper and glue to fishbowl, 15 min (The teacher should be assisting the students to make sure they are gluing and cutting properly and safely.
8.Use scrap construction paper to create organic shapes such as vines and blooming plants to encircle the goldfish bowl. 20 min (The scrap paper is in the bin marked (scrap paper in the back of the room.)
Reflect upon learning
Modeling:
Teacher will demonstrate each step as it instructed.
Checking for Understanding:
Teacher will move about the room to answer questions and supervise student progress. Teacher will informally assess the lesson at this time.
Guided Practice:
The teacher will demonstrate the proper steps in order to accomplish this task.
Independent Practice:
Students will be given ample time in class to complete assigned task, to ask questions, and to
Closure (Student involvement and related to objectives.):
Once the class is complete, the students will hang their work in the hallway. The teacher will discuss what other kinds of animals or objects can be painted and or collaged in the same manner as the work completed in class. Teacher will write the ideas on the board. Teacher should strive to list 15-20 student ideas.
5. ) Assessment:
Formal Assessment:
The teacher will look at final projects for student understanding of Matisse’s collage paintings and use of materials given.
1.The teacher will evaluate final design of each student using the rubric at the bottom of this lesson. (Substitute: Please leave me any notes regarding the student progress but I will fill out the assessment upon my return. Thank you.)
Students will be asked what it means to be a “Wild beast” painter. Students will
Students will be asked to say who painted the original Goldfish painting.
Informal Assessment:
When the teacher is walking around assisting, he or she will be assessing whether or not the students grasps the concept of collage and correctly uses the materials given. During this assessment, the teacher should correct student technique – not their creativity.
Student Work Matisse Original
Adapted from the lesson submitted by Pam Stephens at http://www.princetonol.com/groups/iad/lessons/elem/pam-matisse.htm
Great Painters of the World Unit/Lesson #2 Pablo Picasso
Date: 10-10-08 Subject Area: Art /Design
Name: Jeremy Dumkrieger Grade: 2
Standard/Benchmark being addressed: Level 1. Grades K-2
S1.0 The student understands the visual arts in relation to history and culture.
B1.1 The student knows that specific works of art belong to particular cultures, times,
and places.
CI-2 begins to recognize that art can represent specific cultures, times, and
places by grouping similar works of art together.
S1.0 The student assesses, evaluates, and responds to the characteristics of works of
art.
B1.2 The student understands that works of art can be rendered realistically,
symbolically, or abstractly.
1. Housekeeping Details:
PowerPoint Presentation – Pablo Picasso – A Skewed Life
Print of Picasso’s Girl Before a Mirror
12”x18” white drawing paper
Pencil
Black Sharpie Markers
Oil pastels
Art Journal
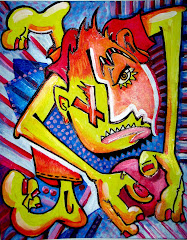
2.) Concept, Generalization, or Skill: Abstraction: The students will create a drawing of three faces imitating Pablo Picasso’s abstract of Cubistic works. The teacher will show Picasso’s painting of the Girl Before a Mirror as of an example. The students will also discuss a brief history of the painter’s life in Spain.
3.) Objectives(s):
Student will:
• Actively explore the works of Pablo Picasso.
• Accurately interprets Picasso’s abstraction style in student work.
• Effectively demonstrate orally, visually, and/or in writing a deep understanding of Picasso’s abstractions.
• Demonstrates use of shape, line, and color in artwork
• Reflect upon learning
4) Procedures:
Open (How will you focus their attention?):
Bell-ringer:
Written on the board, “In your art journals, write down if you believe it is bad luck to break a mirror.”
The teacher will direct the students write their answer in their art journals. The art journals are kept in a box labeled period 4. After one minute, the teacher will focus the students to the front of the room for the answer and lesson. The teacher will lead a short discussion on the validity of broken mirrors. The teacher asks what each of the students would look like if the looked into a cracked mirror. Students respond. The teacher will hold up a cracked mirror for them to see themselves “abstracted.”
Once complete the teacher will transition to the PowerPoint presentation of Pablo Picasso’s work. The slide show will begin with a brief history of Picasso’s life in Spain. Slides will discuss his childhood, his schooling, and his love of bullfighting. Finally, the slides will show works and describe the cubist movement.
Substitute: The slides describe the paintings and life of Picasso. Follow along all the information is included.. If you would like more information there is a book entitled Picasso on the bookshelf near the teacher’s desk.
(Optional: Teacher may explain abstraction further by displaying a photocopied photo of themselves and cutting out the eyes, the nose, and the mouth. The teacher could then re-arrange the body parts on the face to demonstrate abstraction. The teacher could also enlarge or shrink the body parts to describe abstraction.)
Body
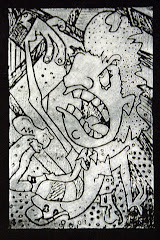
The student will make abstract three faces. One abstraction must be a self-portrait. Student should attempt to illustrate emotions. Students are to use color to demonstrate emotion in art. Red is mad; blue as sad. The teacher should demonstrate the steps as students work.
Day One:
1.Turn the paper horizontal and, using a pencil, begin to draw a face shape in the middle of the paper. It was emphasized that the face can be any shape; it doesn’t have to be oval.
2.Next the students are to draw a “profile” line going down the middle of the face. The face shape should look like there could be two faces in one. The first face should look like it has a front view and side view of a face.
3.The students then add facial characteristics such as eyes, extra nose, mouths, emphasizing the use of SHAPES; the teacher should remind the students to feel as creative as possible. Perhaps their abstract portrait needs five noses or six eyes. The teacher will also remind the class they can display emotion in their faces. What colors could represent which emotions? Red is mad; blue as sad
4.The last step of the drawing is hair. To tie our composition together, the last part was to draw hair. The hair must connect to each of the heads next to the center head. The teacher will explain this creates movement and aids in composition and unity.
5. Following the previous steps, the students are given time to draw the other two faces independently.
Day Two:
6.Students are given a black sharpie marker and asked to trace the entire drawing.
7.Students are to erase any pencil marks with a marker.
8.The students will use at least six different colors to add to their abstractions. Two of the colors must be used on the background.
9.Once the abstract portraits are finished, each student will trace over the black sharpie marker to create a richer black to provide a stronger contrast.
Modeling:
Teacher will demonstrate each step as it instructed. Teacher will model use and safety of each tool used for this project.
Guided Practice:
The teacher will demonstrate the proper steps to accomplish this task correctly and creatively.
Independent Practice:
Students will be given ample time in class to complete assigned task and to ask questions.
Closure (Student involvement and related to objectives.):
Once complete students will stand in front of the class and explain who they abstracted and why. They are to explain any emotion or color representation they used. The teacher will then ask if the students would ever like to visit Spain?
5. ) Assessment:
Formal Assessment:
The teacher will look at final projects for student understanding of Picasso’s abstraction and use of materials given.
2.The teacher will evaluate final design of each student using the rubric at the bottom of this lesson. (Substitute: Please leave me any notes regarding the student progress but I will fill out the assessment upon my return. Thank you.)
Informal Assessment:
The teacher will ask students to demonstrate knowledge of the lesson during student independent study. The teacher will ask questions regarding why a student used a particular color or combination of colors. Who was the famous artist who abstracted figures in this way? What is the movement we are replicating? A: Cubism
Student Work Picasso Original
Adapted from the lesson submitted by Jeannette Smith Anthos at
http://www.princetonol.com/groups/iad/lessons/elem/Jeanette-picasso.htm
Great Painters of the World Unit/Lesson #3 Georgia O’Keefe
Date: 10-10-08 Subject Area: Art/Art History of Painting
Name: Jeremy Dumkrieger Grade: 2
Standard/Benchmark being addressed: Level 1. Grades K-2
S1.0 The student understands the visual arts in relation to history and culture.
B1.1 The student knows that specific works of art belong to particular cultures, times,
and places.
CI-2 begins to recognize that art can represent specific cultures, times, and
places by grouping similar works of art together.
S1.O The student creates and communicates a range of subject matter, symbols, and
ideas using knowledge of structures and functions of visual arts.
B1.1 The student knows how subject matter, symbols and ideas are used to
communicate meaning in works of art.
CI-1 creates works of art that celebrate, record, and communicate important
historical, cultural, and personal events.
Gr. 2 – C.I.1. discuss and apply a range of subject matter in their art.
1. Housekeeping Details:
PowerPoint Presentation – Georgia O’Keefe
Print of a Georgia O’Keefe flower painting
Tempera Paint
Newsprint (palette)
Paint Brush (3)
Water cup
Paper Towels
12" x 18" white drawing paper (or choice of colored papers),
Assorted plants (Real and Faux)
Art Journal
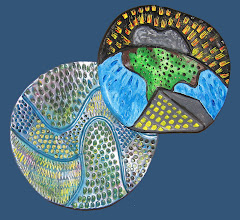
2.) Concept, Generalization, or Skill: Curvilinear lines make organic shapes.
Brief Description of Lesson: Students observe and draw plant forms.
3.) Objectives(s):
Student will:
• Knows and uses curved and organic lines to create organic plant shapes.
• Sees nature as a source for ideas
• Identifies organic forms/shapes in art
• Effectively demonstrate orally, visually, and in writing deep understanding of Georgia O’Keefe’s master works.
• Reflect upon learning
Vocabulary: Georgia O’Keefe, Organic Shape, Organic Form
4) Procedures:
Open (How will you focus their attention?):
Bell-ringer:
Written on the board, In your journal, answer the following question. If you were a flower, what kind of flower would you be?
Teacher will focus the group to the front of the room and restate the question, “If you were a flower, what kind of flower would you be. Field questions, make the student tell you why they chose the flower they did. The teacher should transition the class with, “There is an artist by the name of Georgia O’Keefe and she loved painting flower.
The teacher will then present the PowerPoint Presentation. Works are titled.
Substitute: The slides describe the paintings and life of Georgia O’Keefe. Follow along all the information is included. If you would like more information there is a book entitled O’Keefe and the Southwest on the bookshelf near the teacher’s desk.
Body
The teacher will speak about the lines found in flowers and other plants. The teacher will discuss shapes of the plants by displaying several real and faux plants. Students will be asked to take turns gently touching each real plant to get an idea of how texture of a plant can effect both the lines and shapes it creates.
Students will then be asked to gather the appropriate materials for the assignment. These are posted on the door and material are stored in marked containers around the room.
The students are going to paint a picture of a flower in the style of Georgia O’Keefe. The teacher will direct students to choose a flower to paint from the group of plants provided or from a book on the reference table. The flower must be at least as large as 2/3 of the paper provided. The teacher will demonstrate 2/3 of the paper by folding one and posting it in the front of the room. This is a two day lesson. Students are to use the drying rack to store art after days one and two.
Day One:
1.Students will use pencil to draft their flower, covering at least 2/3 of the paper.
2.Once the teacher comes around to determine 2/3 of the paper is in use, the student will write their name on the back and place it in a pile on the teacher’s desk.
Day Two:
3.Students will gather materials required for painting their flower
4.Students will paint the flower using at least three colors.
5.When finished or within ten minutes of the end of class, the students will clean paint areas, wash out brushes, and place wet paintings in the drying rack.
Modeling:
Teacher will demonstrate each step as it instructed. Teacher will model use and safety of each tool used for this project.
Teacher will provide appropriate pictorial and still life material for student viewing modeling.
Guided Practice:
The teacher will demonstrate the proper steps to accomplish this task correctly and creatively.
Independent Practice:
Students will be given ample time in class to complete assigned task and to ask questions.
Closure (Student involvement and related to objectives.):
Once complete students will stand post their pictures on the front wall of the classroom and the teacher will summarize organic line and shape through the life of Georgia O’Keefe. The teacher will ask the students why would someone draw or paint something larger than life. Why make an enlargement in a painting when an artist can take a photograph and blow it up?
5. ) Assessment:
Formal Assessment:
The teacher will look at final projects for student understanding of Georgia O’Keefe’s style of painting, and the materials and techniques required to accurately interpret them.
3.The teacher will evaluate final design of each student using the rubric at the end of this lesson. (Substitute: Please leave me any notes regarding the student progress but I will fill out the assessment upon my return. Thank you.)
Informal Assessment:
The teacher will ask students to demonstrate knowledge of the lesson during student independent study.
Subscribe to:
Comments (Atom)